Stuck on starting a song and need inspiration? This guide looks at five techniques that will help you jump-start creativity when starting a new song in Ableton Live.
How to Create a Song from a Blank Canvas
One daunting task as a music producer is starting a new project and staring at a blank canvas. Your mind asks where do I start, what genre, what bpm, what synth, and so forth?
Try these five music production techniques the next time you’re stuck gazing at a blank session in Ableton Live.
1. Converting Audio to MIDI
Ableton Live’s conversion commands are excellent for sparking inspiration. They make it easier to discover, edit, and create new musical ideas. You can transform monophonic melodies, polyphonic harmonies, and drum beats into MIDI clips.
https://youtu.be/o_V79br77dw
There are endless audio samples and sample packs available across the internet on websites like Splice. With Live’s conversion commands, you can transform original audio into something new or unique. For example, you can resequence MIDI patterns, rearrange notes and chords, pitch notes, cut sections, and more.
There are two ways to convert audio to MIDI. Select the audio clip and choose a command from the Create Menu or right-click the clip to open the context menu. There are four conversion commands available:
Slice to New MIDI Track
This command divides the original audio into slices and assigns them to MIDI notes in a Drum Rack. A new MIDI track is also created, containing a MIDI clip with one note for each slice.
This method opens many new editing possibilities. For example, you can resequence the slices to create new patterns. Also, each slice lives on its own chain in the Drum Rack. So, you can process the individual slices with different audio effects. You could also try inserting MIDI effects before the Drum Rack to generate ideas. For instance, the Arpeggiator and Random devices can create exciting results.
Note: Slicing differs from the other Convert commands. It uses the original audio to generate sound. The other commands create a MIDI clip that does not play the original sound. Instead, they extract the notes and use them to play an entirely different sound.
Convert Harmony to New MIDI Track
This command identifies the pitches in polyphonic audio and creates MIDI notes for them on a new MIDI track. The track also comes preloaded with an Instrument Rack that plays a piano sound.
Convert Melody to New MIDI Track
This command identifies the pitches in monophonic audio and creates MIDI notes for them on a new MIDI track. The track also comes preloaded with an Instrument Rack that plays a synthesizer sound.
Convert Drums to New MIDI Track
This command extracts the rhythms from percussive audio and creates MIDI notes for them on a new MIDI track. The command also attempts to identify kick, snare, and hi-hat sounds. It then places them into the new clip so they play the appropriate sounds in the preloaded Drum Rack. Live also places any additional sounds on a silent note lane for manual editing.
2. Generate Random MIDI Notes
Creating new harmonies and melodies can be challenging or overwhelming. There are infinite note and chord combinations. Instead of twisting your brain in a knot figuring out ideas, try generating melodies and harmonies with Live’s MIDI devices.
Live offers several MIDI devices that can generate ideas you may not have imagined. With a single note, create endless ideas to jump-start the composition process. The best tools for the job is Live’s Random, Chord, Scale, and Arpeggiator devices. Try using all four devices or a combination of them to generate notes and chords.
- Random: Produces a continuous randomized sequence of the incoming MIDI notes. Define the random patterns with the device controls.
- Chord: Builds a chord from each incoming MIDI note. It can add up to six notes with the user-defined pitch controls. With the Shift controls, you can create minor or major chords that range from simple to complex.
- Scale: Shifts all incoming MIDI notes into a specified key. This device keeps all the incoming notes in check by transposing them to the closest note in the set scale. You’ll never get a wrong note!
- Arpeggiator: Produces rhythmical patterns from either incoming MIDI notes or chords. Set the sequence and speed of the pattern with the device controls.
[yuzo]
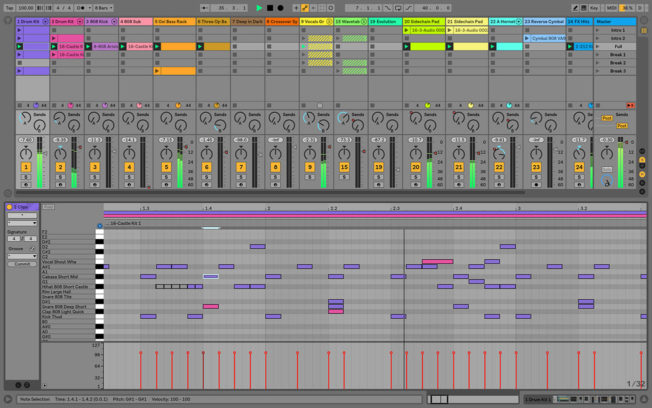
These steps put this technique into practice by randomizing MIDI note patterns:
- Start by creating two new MIDI tracks in Session View. The first track will generate ideas and the second track will record the MIDI notes for editing.
- Rename the two tracks. For example, name the first track ‘Idea’ and the second track ‘Print.’
- Set up the Print track for recording. Access the In/Out Section and select the Idea track from the ‘MIDI From’ chooser. Make sure Monitor is set to Auto or In, and then arm the track for recording.
- Create a MIDI clip on the Idea track, and draw in one or more notes.
- Insert an instrument of your choice on the Idea track.
- Insert MIDI Effects to randomize ideas. Note, the order of these effects will change the outcome. For this example, insert Random first and set Chance to 100% and Choices to 12. Next, insert the Scale device and set Base to your desired key.
- This initial set up will generate random melodies in key. Record the results by triggering the clip on the Idea track and then clicking the Record Button in any clip slot on the Print track.
- Take the technique further by generating chords. Insert the Chord device before Scale. Create a basic minor triad by adjusting Shift 1 to +3 st, Shift 2 to +7 st, and Shift 3 to +12 st. Next, record the results same as before. Also, try building various chords to produce a variety of ideas.
- Go one step further and generate rhythmical arpeggio patterns. Insert the Arpeggiator device after the Chord device. Play with the different settings and record the results.
- Last, drag and drop the different MIDI clips you recorded into Arrangement View. Then cut, combine, and edit the best patterns to create new musical ideas.
3. Use Other Ableton Live Projects as a Starting Point
Open an older project or a project from another artist to use as a template for a new song. A finished project has everything set up and ready to go. Use it as a guide to creating something new. This technique also speeds up workflow!
For example, the rhythm foundation is already built. Try swapping out samples, change note placement, and make other creative decisions. The goal is to create a new drum group from an existing one.
This move also applies to the other elements that make up the song. For instance, swap out instruments, edit or replace MIDI sequences, record audio and process it with existing effect chains, etc. The creative decisions are up to you.
In addition, a template project has a song structure. Use the existing song structure as a roadmap when arranging new ideas. Again, the goal is to use a finished song as a palette to inspire new ideas.
4. Use MIDI Files and Sample Packs
Ignite your initial creative spark when starting a song with MIDI files and samples. There is an abundance of pre-made material online that will give you instant inspiration!
For example, MIDI files can provide melodies, chord progressions, drum grooves, basslines, pads, completed songs, and more. Use the material to discover new ideas and kick-start your creativity. Start by dropping different MIDI files into your project. Then edit, combine, and rearrange the clips or notes to build something new.
MIDI files are also a valuable educational resource. Analyze them to understand chord structures, deconstruct drum patterns, understand supporting melodies, and more.
Sample packs also provide material that will help you discover fresh ideas. For example, drop in various samples to sketch out an initial loop. After developing the loop, you can always swap out the samples or convert them to MIDI. Again, there are endless possibilities.
5. Create a Default Live Set
Inspiration can spark at any time, and it’s important to lay out your ideas quickly while they are fresh. Creating a custom default template with device and track defaults in advance allows you to jump in and create music while your creative energy is flowing.
Ableton Live default templates also make it easier to start every project with convenience. They save valuable time by reducing the repetitive and tedious routines of setting up tracks, groups, routing, and devices every time you open a new Live Set. Having your tools ready improves workflow and keeps the creative momentum going!
Conclusion
Ableton Live’s intuitive feature set allows artists of all skill levels and styles to work with music efficiently. The tips in this guide scratch the surface of what’s possible. So, take these song starter ideas and develop them to fit your workflow. Good luck creating!