Learn what mid-side EQ is and how to use this mixing technique to improve your mix. Find tips on how to treat vocals, drums, bass, mixes, and other mid-side processing methods.
What is a Mid-Side EQ?
Mid-Side (M/S) EQ is an equalizer process that encodes a stereo signal into separate mono and stereo channels. The mid (mono) channel contains information identical in both the left and right channels. The sum of the left and right channels create a mono signal (L+R=Mid). Conversely, the side (stereo) channel contains information that differs between the left and right channels. The difference between the left and right channels creates a stereo signal (L-R=Side). When combined, the mid and side channels produce a full stereo field.
Once encoded into M/S, you can process the mid information independently from the side information. Both channels are then decoded or converted back into conventional left and right stereo channels. This technique allows you to EQ your mix with greater flexibility and precision.
5 Mid-Side EQ Techniques
The applications for mid-side equalization are countless. You can use it for corrective mixing work, mastering, sound design, creative effects, and more. The creativity is in your hands!
Here are five simple mid-side EQ techniques that will improve your mix. For these mixing tips, we’ll use the FabFilter Pro-Q 3 equalizer. The green filter is the mid band, and the blue filter is the side band.
1. Adding Stereo Width to Create a Fuller Sound
Use mid-side equalization to create a wider stereo image on a full mix or individual elements. You can create stereo width by changing the balance between mid and side levels. For example, widen a signal by boosting high frequencies in the side channel or attenuating low frequencies in the mid channel.
Widening the stereo image will make your mix sound fuller and more enjoyable for the listener. Similarly, stereo widening is also beneficial for sound design. For instance, when layering synths to create a wider, more fuller sound.
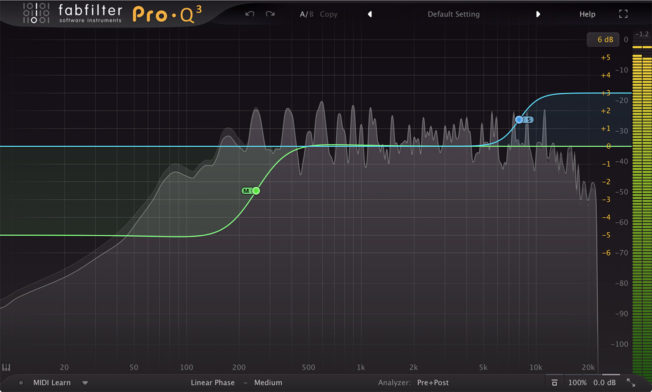
The example above widens a synth track by attenuating the mono signal and boosting the stereo signal with a high-shelf filter at 8,000 Hz. This move creates space to layer a mono focused synth while also creating width. When combined, both layers sound more cohesive, present, and immersive.
This mixing technique may also work better than stereo width plugins sometimes. For example, stereo imaging plugins can affect the phase of a sound, causing it to lose punch. Conversely, mid-side treatment will preserve the impact of the center channel while only widening the side channel.
2. Mixing Bass to Achieve a Tighter Low-End
Modern basslines in electronic music typically have a centered low-end and wider harmonic frequencies in the high-end. Keeping low-end sounds like the kick and bass centered maintains their punch and presence.
Achieve a tighter low-end by treating the bass with mid-side equalization. For example, EQ a stereo bassline to preserve a tight and punchy mono signal while retaining the wider, harmonically rich frequencies. Create this separation by cutting low frequencies from the side channel. The exact frequency cut will vary depending on the content. A good starting point is anywhere between 80 Hz and 250 Hz. Caution against cutting too much from the sides. It can make the bass sound thin and weak. Use your ears!
The example below removes low frequencies from the side channel at 300 Hz. It also boosts the mid channel at 175 Hz to give the mono signal more presence in the mix. Pro-Q 3 has a helpful solo button. Use it to hear the area affected by the EQ filter when dialing in the frequency.
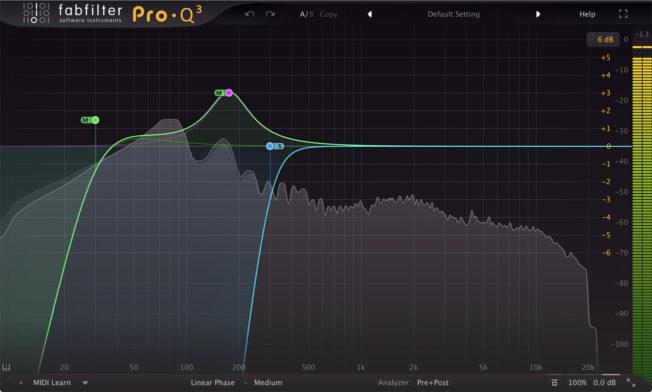
This mixing technique ensures the lowest frequencies are mono. It also removes low frequencies from the sides, which cause clarity and phasing issues. As a result, your bass will sound tighter, present, and focused. It also creates headroom, which will give you better results when compressing the overall mix.
3. Mixing Vocals To Sit Perfectly in the Mix
Mid-side processing works excellent at enhancing vocals and getting them to sit in the mix. Try these vocal mixing techniques on the lead topline and backing vocals:
[yuzo id=13031 ]
Make Space for the Lead Vocal
Lead vocals should be front and center in a mix. Keeping lead vocals centered helps them sit in the mix better, gives them more definition, and retains their punch. Instead of boosting the volume of the vocal track, try making space in the mix for the vocal. For example, use mid-side treatment to carve out mid-range frequencies from instruments that conflict with the vocals.
- Start by finding the frequency range where the vocal has the most energy. Find this range by boosting a bell filter on an EQ and then sweeping across the frequency spectrum. Listen for the dominant frequencies that give the vocal its power. Write the frequency range down and deactivate the EQ.
- Next, group all the instruments with conflicting frequencies in that range.
- Lastly, use a mid-side EQ on the group to cut that frequency range from the mono channel.
These moves create a pocket for the vocals to sit in the mix. Also, dipping the mid frequencies preserves the wider side frequencies, not interfering with the vocals.
Add Clarity and Presence to Vocals
Enhance the lead vocals further by giving them more presence in the mix. The example below uses mid-side treatment on a vocal topline track. The EQ is boosting the mid-range frequencies on the mid channel and attenuating low frequencies on the sides. This move keeps the mid-range focused in the center and pushes the high-end information to the sides.
Balance the Background Vocals with the Lead Vocal
Mid-side equalization also works excellent on background vocals. Backing vocals are generally panned to the sides to make space for the topline in the center. However, if the backing vocals are conflicting with the lead vocal, use an EQ to make space. Simply attenuate the mono frequencies and boost the sides. Use your ears to balance the topline and the background vocals.
4. Mixing Drums to Create a Tighter, More Balanced Sound
Mid-side equalization is also effective at tightening and enhancing a drum group. For example, use the mid and side channels to keep your kick and snare centered while adding width to only the percussion. Or maybe you want to lower the volume of high-end frequencies without affecting the kick and snare. There are various scenarios.
Moreover, boosting or attenuating frequencies with a standard EQ will affect both the mono and stereo frequencies. With a mid-side EQ, you have more flexibility over mixing and balancing your drums. For example, create separation and clarity by cutting or attenuating low frequencies from the side channel. The exact frequency cut will vary depending on the content. This move gives you the freedom to boost the low-end of the kick and snare to add presence and punch without affecting other drum sounds. You can also boost or attenuate higher drum elements to balance the drum kit and add width.
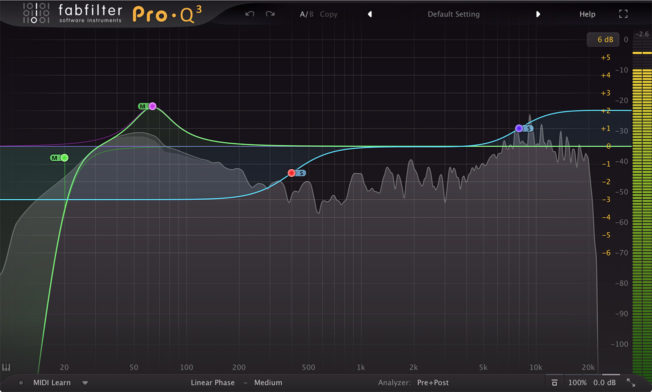
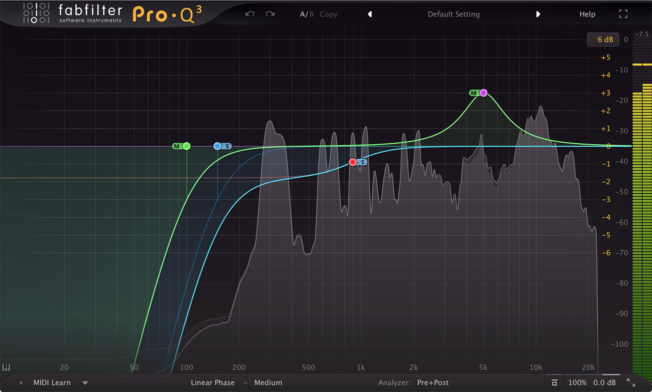
The example above attenuates the side channel at 400 Hz to keep the kick mono and focused. Also, a high-shelf filter is boosting frequencies at 8,000 Hz to add width. Lastly, a bell filter boosting the mid channel at 65 Hz adds presence and weight to the kick drum. Now, there is more space for the kick to cut through the mix. The overall kit also sounds fuller and balanced. However, every drum group will be different. Use your ears to make informed decisions on where to cut or boost!
5. Mastering the Final Mix to Create a Radio Ready Song
Mid-side processing will give your mix more presence, clarity, and balance at the mastering stage. Use an EQ with mid-side capabilities for corrective work, tonal balance, and enhancement. For example, use the M/S mode on an equalizer to:
Tighten up the low-end: Cut low frequencies from the side channel to clean up the bottom end of the mix. This move also places the kick and bass in mono without affecting the stereo information of other elements.
Remove problematic resonant frequencies: Use the EQ sweep technique to identify unpleasant or nasally sounding frequencies. First, boost a bell curve with a narrow Q and then slowly sweep up and down the frequency spectrum. Listen for harsh-sounding spikes. Next, cut those frequencies by reducing the gain on the mid band. Repeat the process to create a clean and pleasant sound. Also, be cautious not to go overboard. Too many narrow cuts can cause phasing issues.
Add presence to the mids and highs: If the mix sounds muddy, try cutting the low-mids between 250 Hz and 500 Hz on the mid channel. You can also add presence to the mix by boosting the mid channel with a high-shelf filter anywhere above 8,000 Hz.
Add presence to vocals: Boost the mono frequencies of a vocal if it sounds buried in the mix. Again, use the EQ sweep technique to identify the vocalist’s strongest frequencies. Then boost those frequencies to add presence. This technique gives you better precision to treat the vocal without affecting the other elements in the mix.
Improve tonal balance: The interaction between all the parts of a song contributes to the overall tonal balance. Correcting tonal imbalances creates a cohesive mix that sounds more natural and pleasing. It also helps the mix translate better on various speaker systems. Balance the tonal spectrum by boosting or attenuating different areas of the mix. Use a broad bell filter on the mid channel and make subtle level changes. Try to achieve perceived equal loudness across the frequency spectrum.
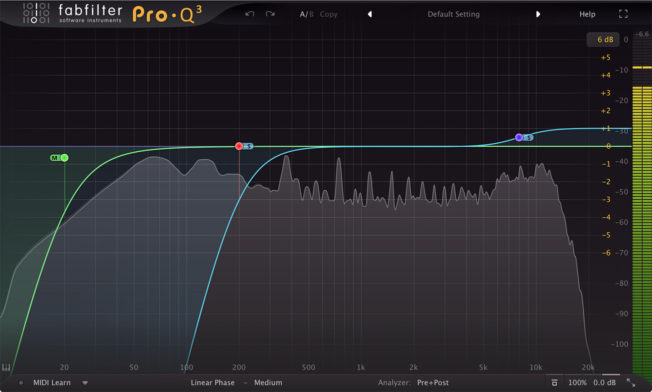
The example above tightens the low-end by cutting rumble at 20 Hz on the mid channel. Next, there is a low cut at 200 Hz on the side channel. This move also tightens the low-end and improves clarity by removing problematic stereo information. Lastly, a high-end boost with a shelving filter on the sides adds brightness, width, and presence to the mix.
Conclusion
Mid-side equalization is versatile and effective. You will find many uses for this mixing technique. Remember to make subtle moves and not to go overboard. It’s easy to cause more issues when misused. Also, consider using linear-phase processing when filtering stereo channels to avoid unwanted phase changes. Again, use your ears!