Learn what sidechaining is and how to sidechain in Ableton Live. This guide takes you through the steps of setting up sidechain compression. It also shows you how to sidechain third-party plugins.
What Is Sidechaining in Music Production?
Sidechaining is a technique in music production that uses an audio signal from one track to control an audio effect on another track.
Sidechaining has a variety of uses, from practical audio mixing to creative sound design. Several plugins have external sidechain inputs, including compressors, equalizers, gates, filters, vocoders, de-essers, synths, and similar devices.
As a music producer, you will find many applications for sidechaining. You can apply it to bass, drums, vocals, synths, effects, bus groups, full mixes, and more.
[yuzo]
How to Sidechain in Ableton Live Using a Sidechain Compressor
The most common use of sidechaining in electronic music and pop music is sidechain compression.
Sidechain compression is an essential mixing technique that creates groove and separation between two sounds. Creating space for important elements in the mix will improve clarity, presence, and punch.
For example, use a sidechain compressor to control competing low frequencies between the kick and bass. Sidechain compression creates separation by quickly reducing the volume of the bass when the kick drum plays. This technique gives the kick drum space to cut through the mix.
This guide takes you through the steps of setting up sidechain compression using Ableton Live‘s Compressor device. You’ll learn how to use a sidechain compressor to make space for vocals being masked by a synth sound. This technique will make the vocals sound more present in the mix.
Note: You can use this exact sidechaining technique to reduce masking and clashing frequencies between any two sounds. It’s not limited to vocal mixing.
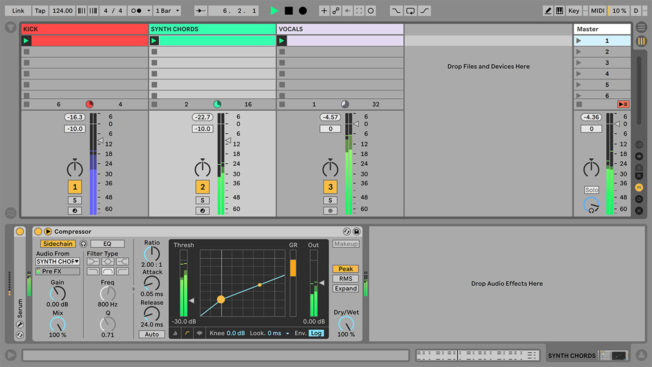
1. Load Ableton Live’s Compressor on a Synth Track
Instruments like synths, guitars, strings, and drums often have frequencies that interfere with vocals. These clashing frequencies affect the clarity, punch, and presence of your vocals.
Sidechain compression is an effective mixing technique that will help you control the instruments competing with your vocals.
Set up a sidechain compressor by first loading Live’s Compressor device on the instrument track clashing with the vocals. You could also group all the instruments with interfering frequencies and apply sidechain compression to the group. For simplicity, let’s use a single synth track causing frequency masking issues.
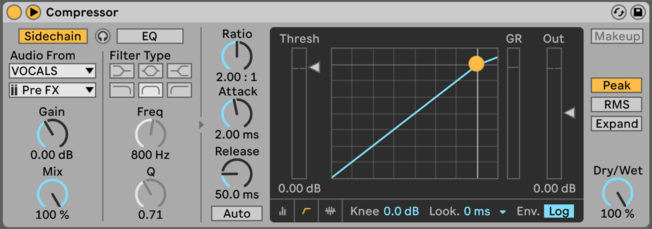
2. Access the Compressor’s Sidechain Section
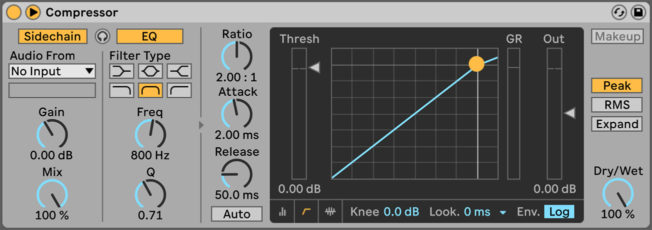
Access the Sidechain parameters by toggling the sidechain button in the title bar. The sidechain toggle button reveals two sections: External and EQ.
- External Sidechain: Enable the Sidechain button in the left section to select Live’s internal sidechain routing parameters. Here, you can choose an external source track to trigger sidechain compression.
- Sidechain EQ: Enable the EQ button to trigger sidechaining by a specific band of frequencies, instead of a sidechain input track. This option is useful to isolate a frequency range from a loop. For example, to create a trigger by isolating the kick from a mixed drum loop.
For this example, enable the Sidechain button to access the sidechain routing parameters. This step allows you to choose an external source like the vocals as a trigger.
3. Choose a Sidechain Track to Trigger Sidechain Compression
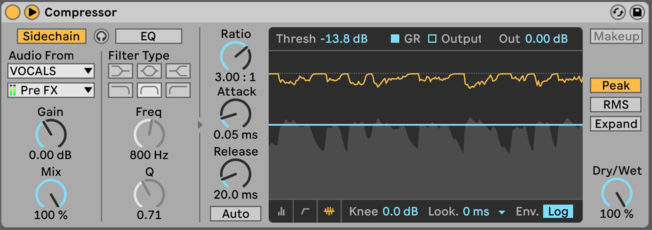
Sidechaining requires an external sidechain trigger track. For this example, click the top dropdown menu under “Audio From” and choose the lead vocal track.
Every time the vocal plays, the synths will attenuate or “duck” in volume. Think of it as an automatic volume control. By reducing the volume of the synths, you create space for the vocal to sound more present in the mix.
Next, select “Pre FX” from the bottom dropdown menu. This option sets the external tapping point. You can tap the input signal from these three points:
- Pre FX: Selects the output signal before it passes through the track’s device chains and mixer. It’s the original, unprocessed audio signal.
- Post FX: Selects the output signal after it passes through the track’s device chains. It’s the audio signal processed by all the plugins on the track.
- Post Mixer: Selects the final output of a track, after it passes through its device chains and mixer.
Pre FX will give you a clean and more accurate signal. Vocal effects like reverb and delay can alter the accuracy of the trigger.
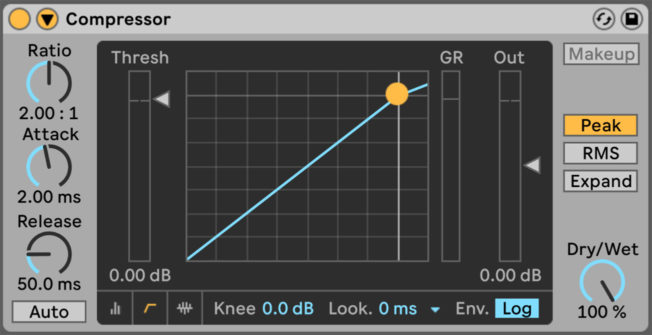
4. Adjust the Compressor Settings to Control the Ducking
Adjust the compressor settings to get the desired results. The four primary parameters to set are Threshold, Ratio, Attack, and Release.
- Threshold: The threshold control sets the dB level where the audio signal must exceed to activate compression. Any signal that passes above the threshold level gets compressed.
- Ratio: The ratio control sets the amount of gain reduction the compressor applies when the signal passes a certain threshold.
- Attack: The attack control sets the time it takes for the compression to start once the signal passes a certain threshold.
- Release: The release control sets the time it takes for the compression to stop once the signal falls below a certain threshold.
Start with a ratio of 2:1, a fast attack time at 0.10 ms or less, and a fast release time at 30 ms or less.
Next, lower the threshold level until you have a subtle amount of gain reduction around 2-3 dB.
Last, adjust the Ratio, Attack, and Release controls to taste. Aim for a fast attack that quickly attenuates the masking instrument without causing pops or clicks. Also, find a fast release time that recovers from gain reduction before it re-triggers. However, setting the Release too fast can create a “pumping” effect and other unnatural sounds.
Note: For best results, apply subtle amounts of side compression that sounds natural and transparent. The goal is to reduce the masking instruments enough to let the vocal shine without sacrificing their impact and presence.
How to Sidechain Third-Party Plugins in Ableton Live
Ableton Live features an external sidechain source chooser for several of its native devices. You can route audio from Live’s Compressor, Glue Compressor, Auto Filter, Multiband Dynamics, Gate, Corpus, and various Max for Live devices.
However, third-party plugins used in Ableton Live 9 and older versions do not provide a sidechain input chooser. Routing audio within a third-party plugin is a feature only supported in Live 10 and later.
These steps show you how to sidechain third-party plugins in Live 10 and earlier versions of Ableton Live:
Sidechaining in Live 10 and Later
Live 10 simplified sidechaining by adding a routing panel to VST3 compatible plugins. Follow these steps:
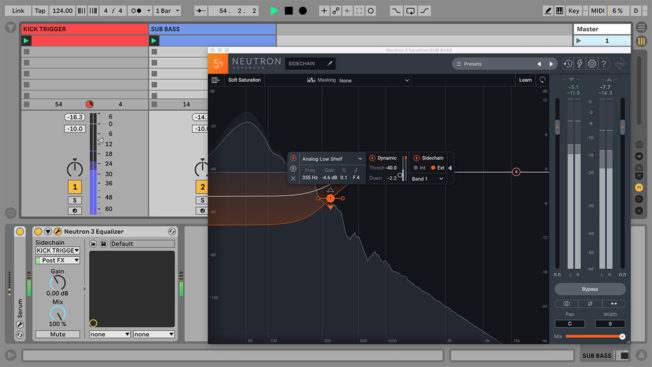
- Add a sidechain capable VST or Audio Unit plugin to a dedicated sidechain track.
- Enable the sidechain option within the plugin’s GUI. This feature will vary from device to device. Read the plugin’s manual for exact instructions. This example uses iZotope’s Neutron Equalizer. For this plugin, activate the Sidechain option and set the input sidechain source to “Ext.”
- Create an Audio or MIDI sidechain track and add a sound source. This track will be the sidechain trigger signal.
- In Live’s plugin GUI, enable the “Sidechain” button. Then choose the sidechain trigger source in the “Audio From” dropdown menu.
- Adjust the Gain and Mix controls to taste on the loaded plugin.
Note: Sidechain functionality depends on the plugin. If the plugin does not support external sidechaining, then it won’t have sidechain routing.
Sidechaining in Live 9 and Earlier
Live 9, and earlier versions do not support sidechain routing within third-party plugins. However, it’s still possible to sidechain third-party party plugins in earlier versions of Live. It requires more configuring to route the sidechain trigger signal.
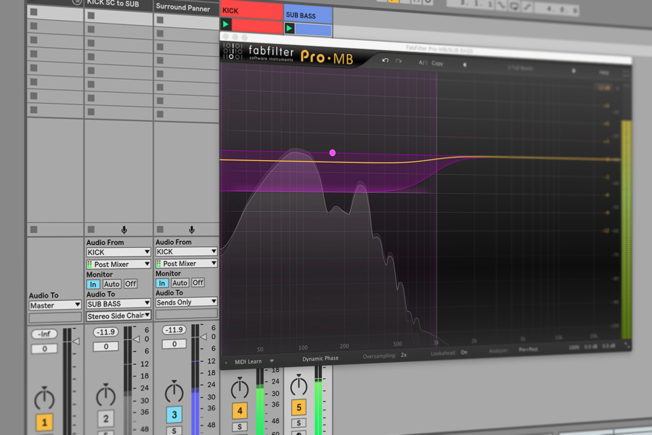
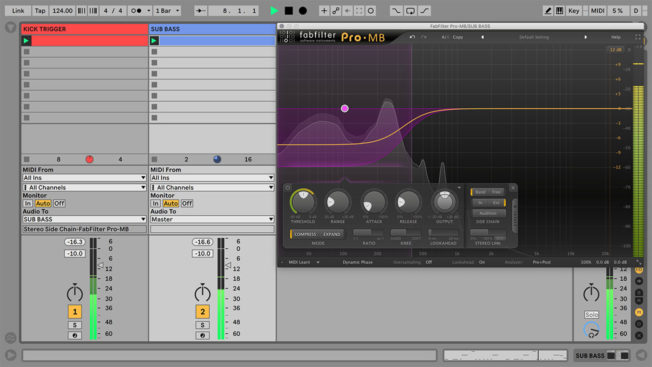
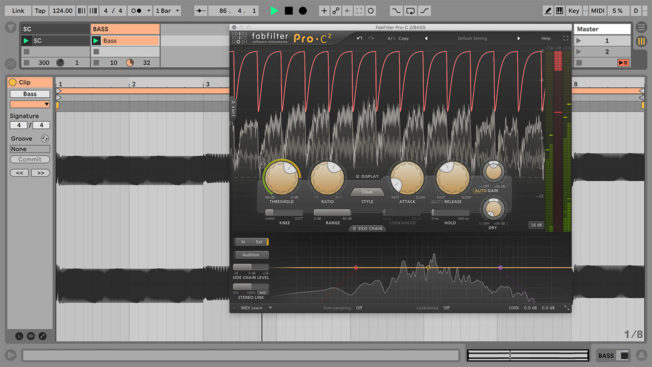
This method uses Live’s track mixer In/Out section to route a kick track trigger source to FabFilter’s Pro-MB. Follow these steps:
- Load the sidechaining capable VST or Audio Unit plugin on the desired track. For this example, it’s a sub-bass track.
- Create an Audio Track with the shortcut command Cmd+T [Mac] or Ctrl+T [PC]. Next, add a signal source, like a kick drum. This track will be the sidechain signal trigger.
- Expand the Audio Track’s In/Out section with the shortcut command Cmd+Alt+I [Mac] or Ctrl+Alt+I [PC].
- From the top “Audio To” chooser menu, select the track with the third-party plugin. For this example, choose the sub-bass track.
- From the bottom “Audio To” chooser menu, select the third-party plugin. The plugin is Pro-MB in this example.
- Check to see if the third-party plugin is receiving the sidechain input source. You may have to enable the sidechain option within the plugin’s GUI. Read the plugin’s manual for exact instructions.
- Adjust the plugin’s controls for desired results.
Note: You will not hear the sidechain trigger track. The signal is being sent to the third-party plugin and not the Master output.
There’s also a downside to this approach. You will need to create a new sidechain routing track for every third-party plugin you use for sidechaining. The best way to manage the multiple tracks is by “Grouping” them to preserve screen real estate.
Other Ways to Sidechain Ableton Live’s Compressor
You can use a sidechain compressor in various ways. The possibilities are near endless. Sidechaining is excellent for creating separation, groove, excitement, effects, unique sounds, and more. It’s a versatile and necessary technique to learn!
Use Sidechain Compression for Mixing
Here are five examples of how to use sidechain compression as a mixing tool:
- Create space for vocals and various instruments to cut through the mix.
- Control messy delay echoes or reverb tales interfering with main elements in the mix.
- Fix phasing and frequency masking issues caused by elements with similar frequencies.
- Control individual frequency bands on a full mix during mixing or mastering.
- Achieve better kick and bass relationships by creating separation and groove.
Use Sidechain Compression Creatively
Here are five examples of how to use sidechain compression for sound design:
- Create bass wobbles, pumping pads, and other LFO style sounds.
- Create a tremolo style pumping effect and sound pumping transitions.
- Duck synth stacks to create pumping synth chords.
- Create epic reverb swells after a synth or vocal.
- Design rhythmic basslines, leads, and other melodies.
Conclusion
Learning how to sidechain in Ableton Live is essential. It’s a technique every music producer should know.
Spend time experimenting with the different ways you can apply sidechaining. Discover how it can shape and affect sounds. You’ll find exciting ways to boost your music production skills and the quality of your mixes.