Compression ratios are often the most misunderstood control on a compressor. This beginner’s guide to compression explains what an audio compressor ratio is and how it affects your music.
What Is An Audio Compressor Ratio?
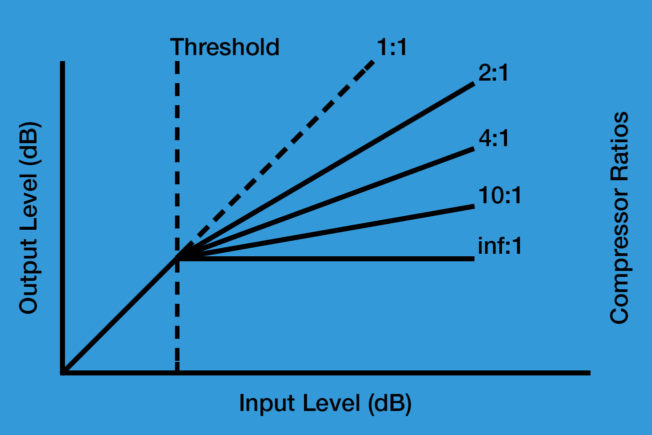
The compression ratio determines how much gain reduction the compressor applies when the signal passes a threshold level. For example, a ratio of 4:1 means that for every 4 dB the signal rises above the threshold, the compressor will increase the output by 1 dB. Whereas a ratio of 10:1 or higher will make the compressor effectively act as a limiter. However, if the ratio is 1:1, no compression will occur.
[yuzo id=13031 ]
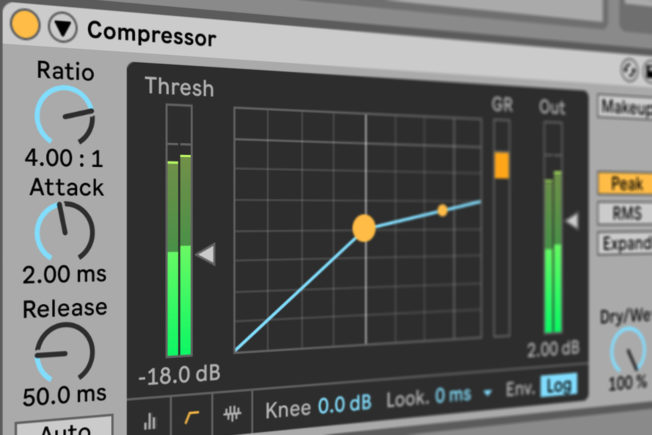
What Does the Ratio Knob on a Compressor Do?
The ratio knob sets the amount of applied compression. The numbers on the knob indicate the ratio of input to output. The higher the ratio, the more extreme the compression. Compressors usually express ratio levels in decibels (dB). For example, with a compression ratio of 2:1, the input signal must cross the threshold by 2 dB for the output level to increase by 1 dB.
However, the available ratios depend on the type and manufacturer of the compressor you’re using. For example, here are basic ratio settings available on most compressors:
- 1:1 applies no compression. The input and output levels remain the same regardless of the threshold level.
- 1.5:1 applies subtle compression. This ratio is gentle and transparent sounding. It will preserve the natural peaks and valleys.
- 2:1 applies light compression. This ratio smoothly controls the dynamics without causing noticeable changes to tone and punch.
- 3:1 applies moderate compression. This ratio setting is slightly more aggressive. It applies gentle transient control while retaining natural dynamics.
- 4:1 applies medium compression. This ratio has tighter control over transients. There will be subtle changes to tone, punch, and loudness.
- 10:1 applies heavy compression. This ratio is aggressive. It will dramatically reduce dynamic range, causing a signal to lose punch, clarity, and presence if pushed hard.
- 20:1 to Infinity:1 is limiting. At Infinity:1, the compressor essentially blocks the signal from crossing the threshold.
Note: All the controls on a compressor work together. It’s best to adjust them in tandem instead of focusing on the ratio knob in isolation. For example, the ratio and threshold work together. Compression only takes place when the signal rises above a set threshold level. The compressor will then lower the level of signals exceeding the threshold level at a ratio set by the ratio control.
Compressor Ratio Basics
There are no specific ratio settings that work best on any particular sound. It would be misleading to list specific ratio settings because every sound and compressor is different. The ratio settings you choose also depend on the source audio, the other compressor control settings, and the result you’re aiming to achieve.
The best approach is to use your ears and meters to determine the right ratio for each sound. There are also general tips to help you find a starting point when setting the compressor ratio. Consider these compressor ratio basics:
- Low Ratios: Lower compressor ratios are natural and transparent sounding. They work best for applying subtle compression while also preserving the natural peaks and valleys of a signal. However, lower ratios will have less dynamic control.
- Medium Ratios: Moderate compressor ratios apply gentle dynamic control that retains a signal’s natural sound. They give you tighter control over transients without causing noticeable changes to tone and punch. You may also notice a sound that’s fuller and louder.
- Heavy Ratios: Higher ratios will cause a more processed, aggressive sound. They work best for extreme tone shaping and dynamic control. However, use heavy compressor ratios with caution. They can cause a signal to lose punch, clarity, and presence.
- Limiting: An infinite ratio will prevent the signal from exceeding a digital ceiling. The result reduces dynamic range and increases the perceived loudness of a signal. However, limiting comes at the price of losing detail and punch. It also introduces digital distortion and clipping when pushed hard.
Note: To get technical, there is also a math equation for calculating the output of a compressor. However, best to use your ears and meters when making informed decisions.
Conclusion
Understanding the compressor ratio control is essential. Learning how the different compressor settings work together will help you achieve the best results. Also, remember to listen carefully while applying compression. And, use compression with caution. Aggressive compressor settings can adversely affect the tone, punch, clarity, and presence of an audio source.