ICON Instructor Paul Laski explains how to enhance your mixes with white noise and demonstrates how to build a custom White Noise Generator Instrument Rack in Ableton Live. Free White Noise Instrument Rack download included!

What is White Noise?
White noise is a type of audio signal with equal frequency energy that spans across the entire audible spectrum (roughly 20Hz to 20,000Hz). Most synthesizers (hardware and software) will provide a noise oscillator for generating this type of sound.
White noise has several creative uses in music production and sound design; from adding a layer of energy to a synthesized instrument sound (lead, bass, pad, etc.) to creating a sense of tension over an entire mix.
In this guide, I’d like to walk you through the steps of creating an effective ‘White Noise Generator’ Instrument Rack for Ableton Live. You will also learn how to make use of the Instrument Rack’s powerful Macro controls to create white noise sounds that are instantly tweakable with MIDI-mapped controls or automation.
As a bonus, we’ll include a free download for the Instrument Rack as well, so you can use it in your own productions!
[download id=”9908″]
Setting up the White Noise Generator Rack
Let’s consider a few things before creating our Instrument Rack. First off, which synthesizer should we use? This can honestly be any synth plugin that you prefer. For this demonstration, I will use Ableton Live’s Operator.
Step 1 | Setting up the Noise Oscillator
Change Operator’s default oscillator (Oscillator A) to play ‘Noise White.’

Step 2 | Group to an Instrument Rack
We’ll need to ‘Group’ our synth into its own Instrument Rack to make use of Macro Controls. We can do this by right-clicking or Control-clicking on Operator’s title bar and selecting ‘Group’ from the context menu. You can also click on Operator and hit Command+G [PC] or Control+G [Mac] to create an Instrument Rack. This method will give us access to a set of mappable Macro controls and other powerful Rack features.

Step 3 | Macro Mapping Volume Control
Next, we should consider the types of Macro Controls to set up. White noise oscillators can sound reasonably annoying if they are too loud and/or are sustained continuously, with no movement whatsoever.
Right off the bat, let’s set up a Macro Control to adjust volume levels. We’ll map Operator’s master volume control to Macro 1. Macro Controls are assigned by right-clicking or Control-clicking on a parameter and then selecting ‘Map to Macro #’ from the context menu.

Now that we have a Macro Control to adjust levels, change its value to ‘0 dB’ so we can hear it play back at full volume.
Step 4 | Macro Mapping Filter Controls
Since white noise plays evenly across the whole frequency spectrum, using a filter really allows us to shape its tone. By having quick access to a filter’s frequency cutoff and the resonance controls, we can shift the energy of the sound to create sweeping effects and movement with ease.
Let’s setup filter controls by mapping Operators ‘Frequency’ control to Macros 2 and the ‘Resonance’ control to Macro 3. Use the same mapping methods explained in the previous step.

Step 5 | Macro Mapping Filter Types
Operator’s filter defaults to ‘Lowpass,’ but it might also be nice to have access to other filter types for more drastic tone shaping. Let’s go ahead and map the ‘Filter Type’ chooser to Macro 4. After mapping this control, set the Macro value to 65. This value corresponds to the ‘Bandpass’ filter.
I like the Bandpass filter for noise since it allows me to focus the energy within a certain range of frequencies. This method works great for creating sweep and riser effects when moving the filter frequency cutoff Macro Control.

Step 6 | Setting Filter Slopes
Next, I’ll change the ‘Filter Slope’ from 24 (dB/octave) to 12 (dB/octave). This gives us a more gradual slope on either side of the bandpass, which sounds a bit more full.
That about does it for the filter controls. However, there are some more parameters I’d like to access with Macros for even more control.

Step 7 | Macro Mapping Envelopes
First off, it would be nice to map the noise oscillators Volume Attack and Release envelopes so we can shape the sound even further. This will also allow us to create fade-ins and fade-outs.
For this step, I’ll map the ‘Attack Time’ to Macro 5 and the ‘Release Time’ to Macro 6.

Step 8 | Macro Mapping Effects
I’m also a big fan of Operator’s ‘Spread’ control. This adds a nice chorusing effect that enhances the stereo width of the noise! If your synth doesn’t have a similar built-in effect, feel free to add any Chorus device to the Instrument Rack.
To assign Chorusing, simply map the devices ‘Dry/Wet’ control to any available Macro. For this example, we’ll map Operator’s ‘Spread’ control to Macro 7.

Step 9 | Renaming and Color-Coding
For this final step, I’ll rename and color-code the Macro Controls to keep them neat and organized. You can change the name and/or color of a Macro Control by right-clicking or Control-clicking on the Macro and selecting ‘Rename’ or choosing a color from the context menu.
After that, I’ll rename this Instrument Rack ‘P-LASK Noise Generator’ and save it to my User Library.

Applying White Noise to Your Projects
Now that we’ve completed the White Noise Generator Instrument Rack, and set up some Macro controls to tweak our white noise, let’s look at some creative ways to use our new instrument.
Adding White Noise Energy to the Mix
One simple trick I like to use in my tracks is to leave the white noise playing continuously at a low volume. This technique adds a subtle atmosphere layer that fills out the mix more.
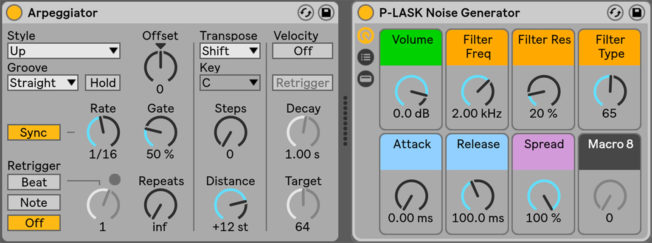
Using the Macro’s for the filter cutoff and resonance, I can find a frequency that sounds good within the context of my mix. I usually set the cutoff to shape the high-mid to high frequencies. I also keep the ‘Volume Macro’ quite low. This technique adds some high-frequency energy into the track to hype things up a bit. Try using the following settings to get started.
Here’s an example of a track I produced with NIVL, aka ICON Instructor David Garcia. Listen for the white noise layered in during the intro.
Pumping White Noise for Energy and Groove
If you want to add some groove to this white noise layer, consider sidechain compressing it to your kick or other drum elements. You could even use Live’s Auto Pan ‘Sidechaining’ trick demonstrated in my Creative Auto Pan Tips guide.
[yuzo]
Creating High Hats
White noise also works great at creating high hats. Achieved this technique by placing an Arpeggiator MIDI effect before the White Noise Generator Rack. Adjust the ‘Rate’ and ‘Gate’ controls respectively to control the rhythm and the length of the noise hats.

White Noise Risers and Downsweeps
Having trouble finding the perfect riser and downsweep effects? Look no further than your White Noise Generator!
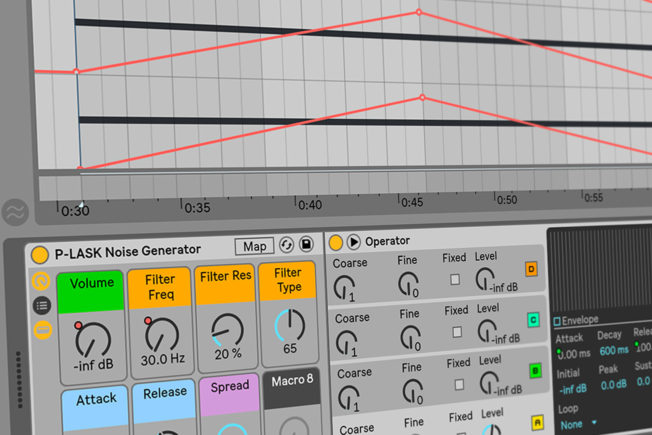
First, record in a long MIDI note. Any note will do, as white noise does not have a pitch. Secondly, automate the ‘Filter Frequency’ and ‘Volume’ Macros from a low to a high value to create a riser effect. This technique works great at injecting excitement leading up to the end of a build.
Conversely, moving the same Macros in the opposite direction creates a nice downsweep. This type of effect sounds nice at the beginning of the chorus or drop. The example below illustrates automation used to create a rise and downsweep effect.

Wrapping It Up
This guide offers a few simple and effective techniques for creating a White Noise Generator Instrument and putting it to use creatively. Now that you have the Instrument Rack preset saved, you can easily drop it into your Ableton Live project to add some energy and tension.
As an added tip, don’t forget to try resampling your white noise with different automation curves, different filter types, spread amounts, etc. You could also try holding down a MIDI note and recording some automation manually with the Macro Controls.
Finally, Phaser and Flanger effects work wonders on white noise. They add movement in other unique ways. Before you know it, you’ll have built up your own sample pack of transition effects and different texture sounds. Go make some noise!